Perfectly Fluffy Buttermilk Waffles
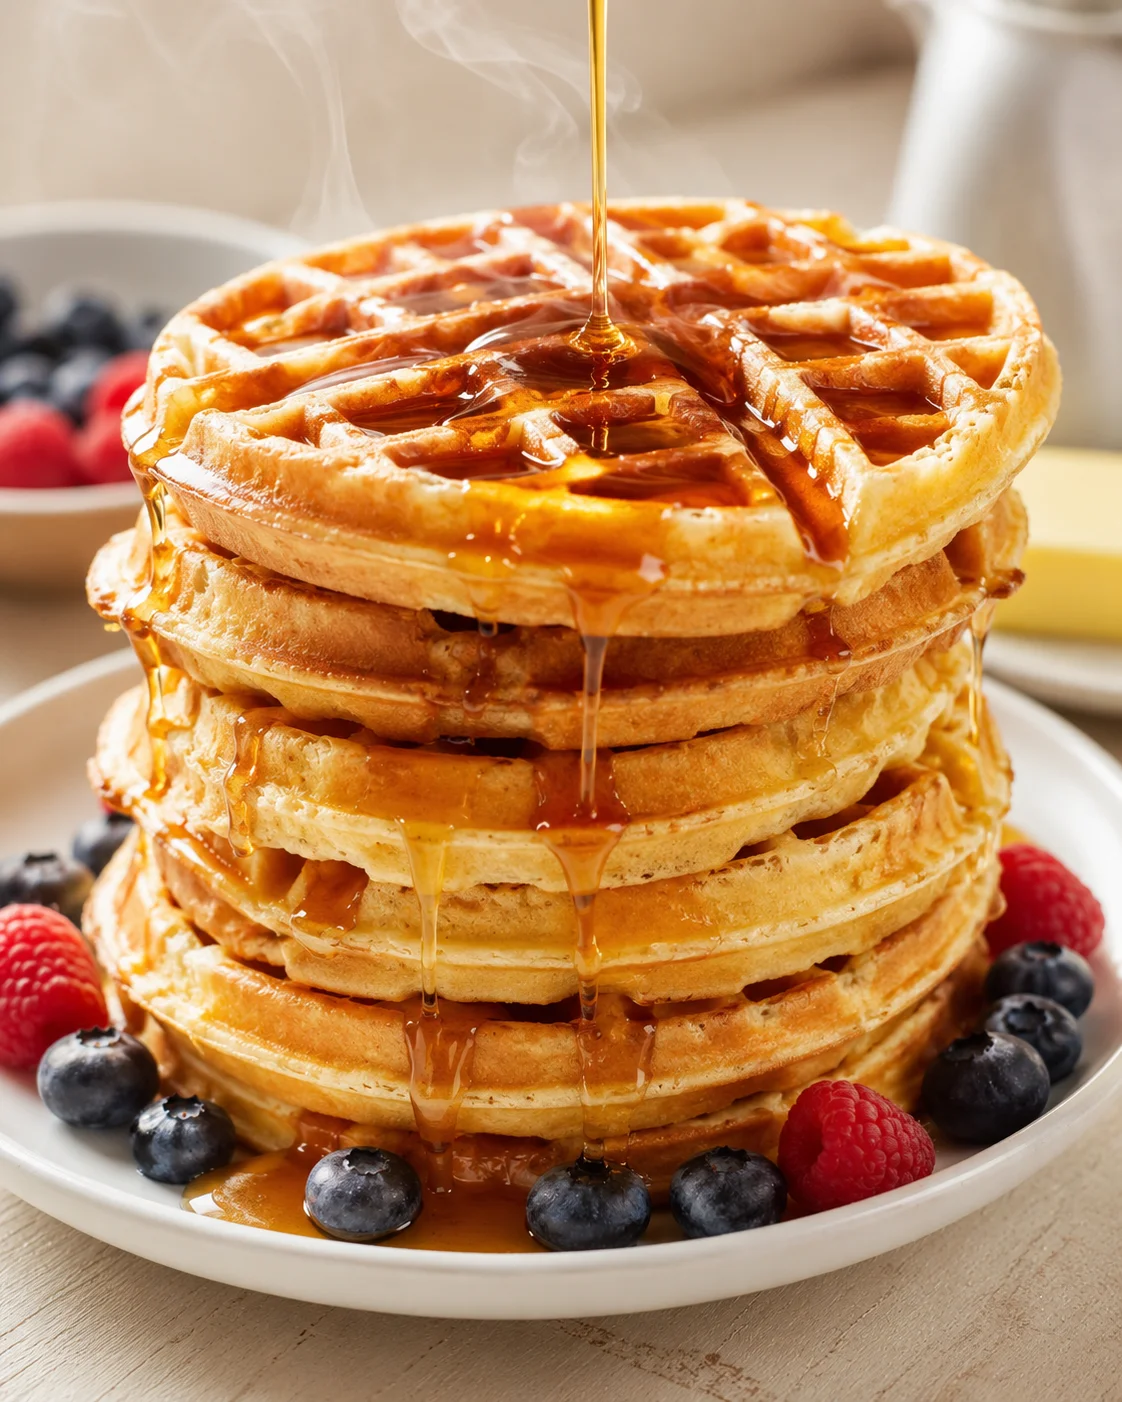
Certain aromas instantly zap me back to my childhood, and nothing beats the warm, buttery smell of buttermilk waffles baking on a Saturday morning. Weekends at my grandmother’s house always meant one thing: delicious food and family time. Her kitchen was our cozy gathering spot, but those buttermilk waffles? Truly unforgettable. I have fond memories of standing on a stool, my little apron tied tight, watching her pour that creamy batter onto the hot waffle iron. The sizzle and steam, the sweet anticipation—those moments felt magical. She used to say, “Sweetheart, the secret’s the buttermilk. That’s what makes them sing!”
Years later, I tried to bring that same magic to my own kitchen. I went through plenty of batches that ended up either too dense or a bit burnt, definitely not those fluffy clouds I remembered. It took time, patience, and learning the ropes of what really makes buttermilk waffles light and crispy. It’s not just about the right ingredients—it’s about the method, the timing, and a little love thrown in. Now, when I whip up these waffles for my family, I watch the same excitement light up their faces, just like mine did once. This recipe is more than breakfast; it’s about passing down a family tradition, making new memories, and savoring those little joyful moments. I’m excited to share my go-to recipe for perfect buttermilk waffles with you, so you can fill your home with that same comforting smell and taste.
If you ever find yourself daydreaming about the smell of warm, buttery buttermilk waffles, you’re in the perfect spot. I’m here to walk you through my grandmother’s classic buttermilk waffle recipe, fine-tuned after plenty of trial runs, so you can make waffles with that perfect fluffy center and crisp, golden edges—every single time. This isn’t about fancy techniques or hard-to-find ingredients; it’s a cozy, kitchen-tested recipe designed for real life.
Here’s what you’ll get:
- Clear, easy-to-find ingredients (and a simple buttermilk swap!) plus why each one is important.
- Step-by-step instructions with timing and technique tips that make the big difference for perfectly airy buttermilk waffles.
- Expert advice for getting your waffles crispy, troubleshooting tips for sticking or flat waffles, and notes about mixing, resting the batter, and preheating.
- Serving suggestions, fun mix-in ideas, plus smart make-ahead, cooling, storing, and reheating tips so your leftovers stay amazing.
- A handy FAQ covering common questions you’ll probably have along the way.
Keep reading, and you’ll walk away with a fail-proof recipe and all the key tips to turn your Saturday-morning waffle ritual into an everyday joy—no magic wand needed, just simple know-how and delicious buttermilk waffles.
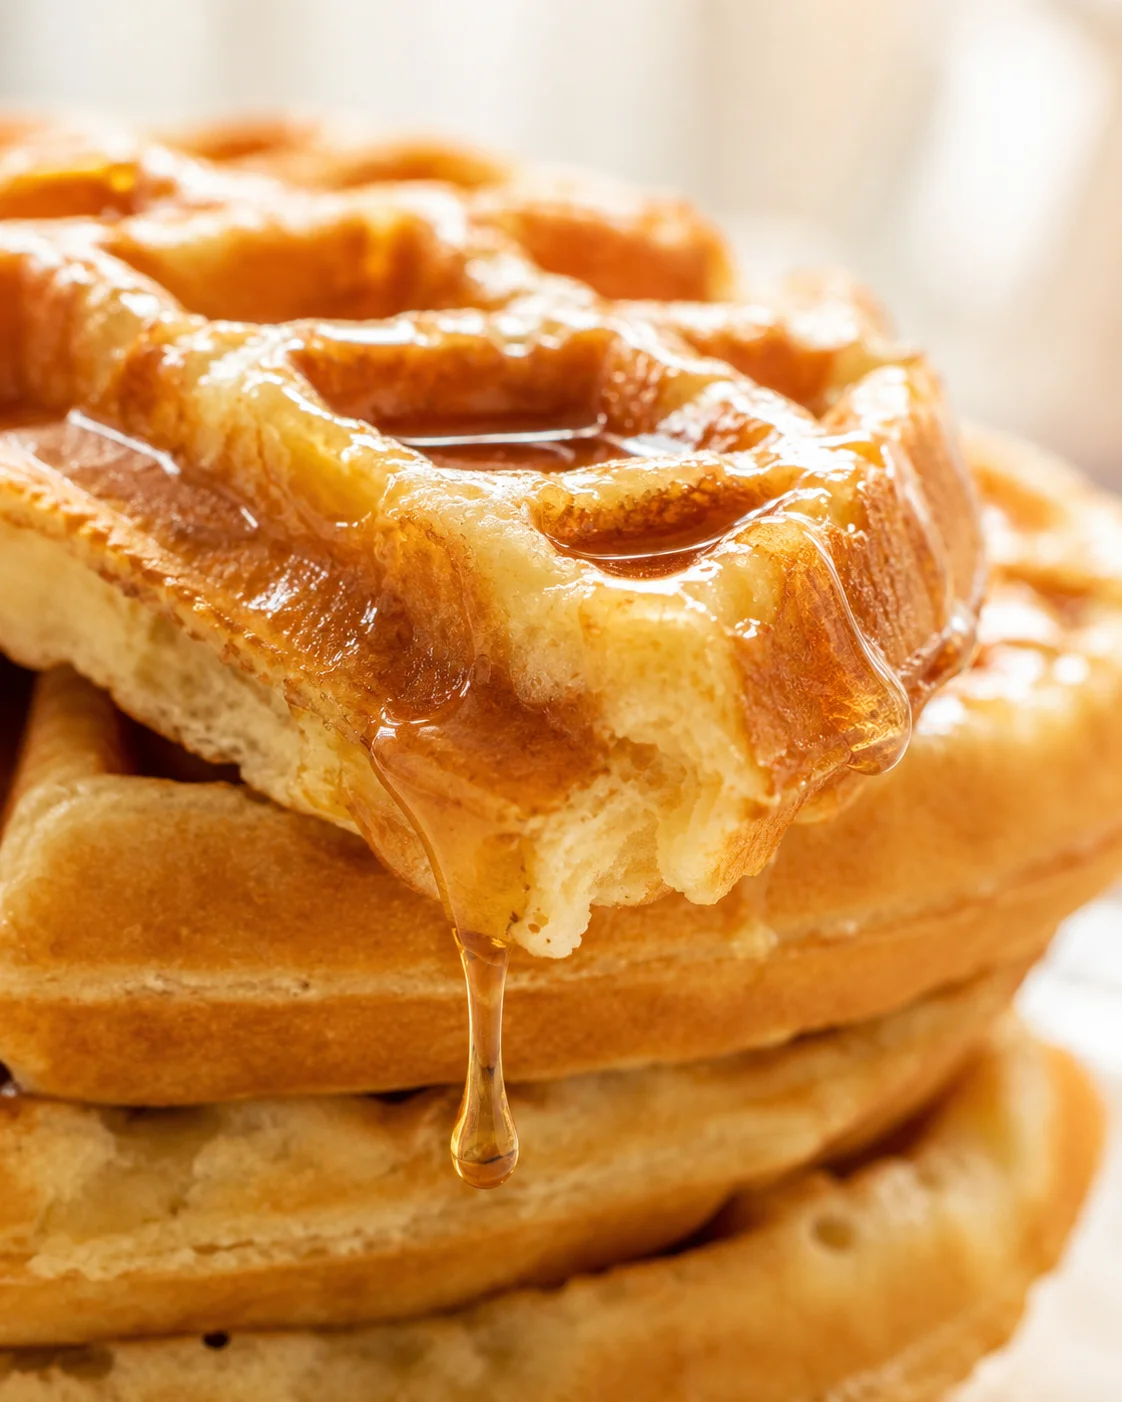
Fluffy, Crispy, and Easy
- Fluffy Inside, Crispy Outside: Thanks to the magic of buttermilk and the right mix of leavening agents, these waffles come out airy and soft in the middle, with that beautiful golden crunch on the edges that makes buttermilk waffles so crave-worthy. If you love an extra-crisp bite, try these Crispy Cornbread Waffles.
- Easy Pantry Staples: No fancy ingredients here! Most of these staples are probably sitting in your kitchen right now, so these buttermilk waffles are a breeze to whip up whenever the craving hits.
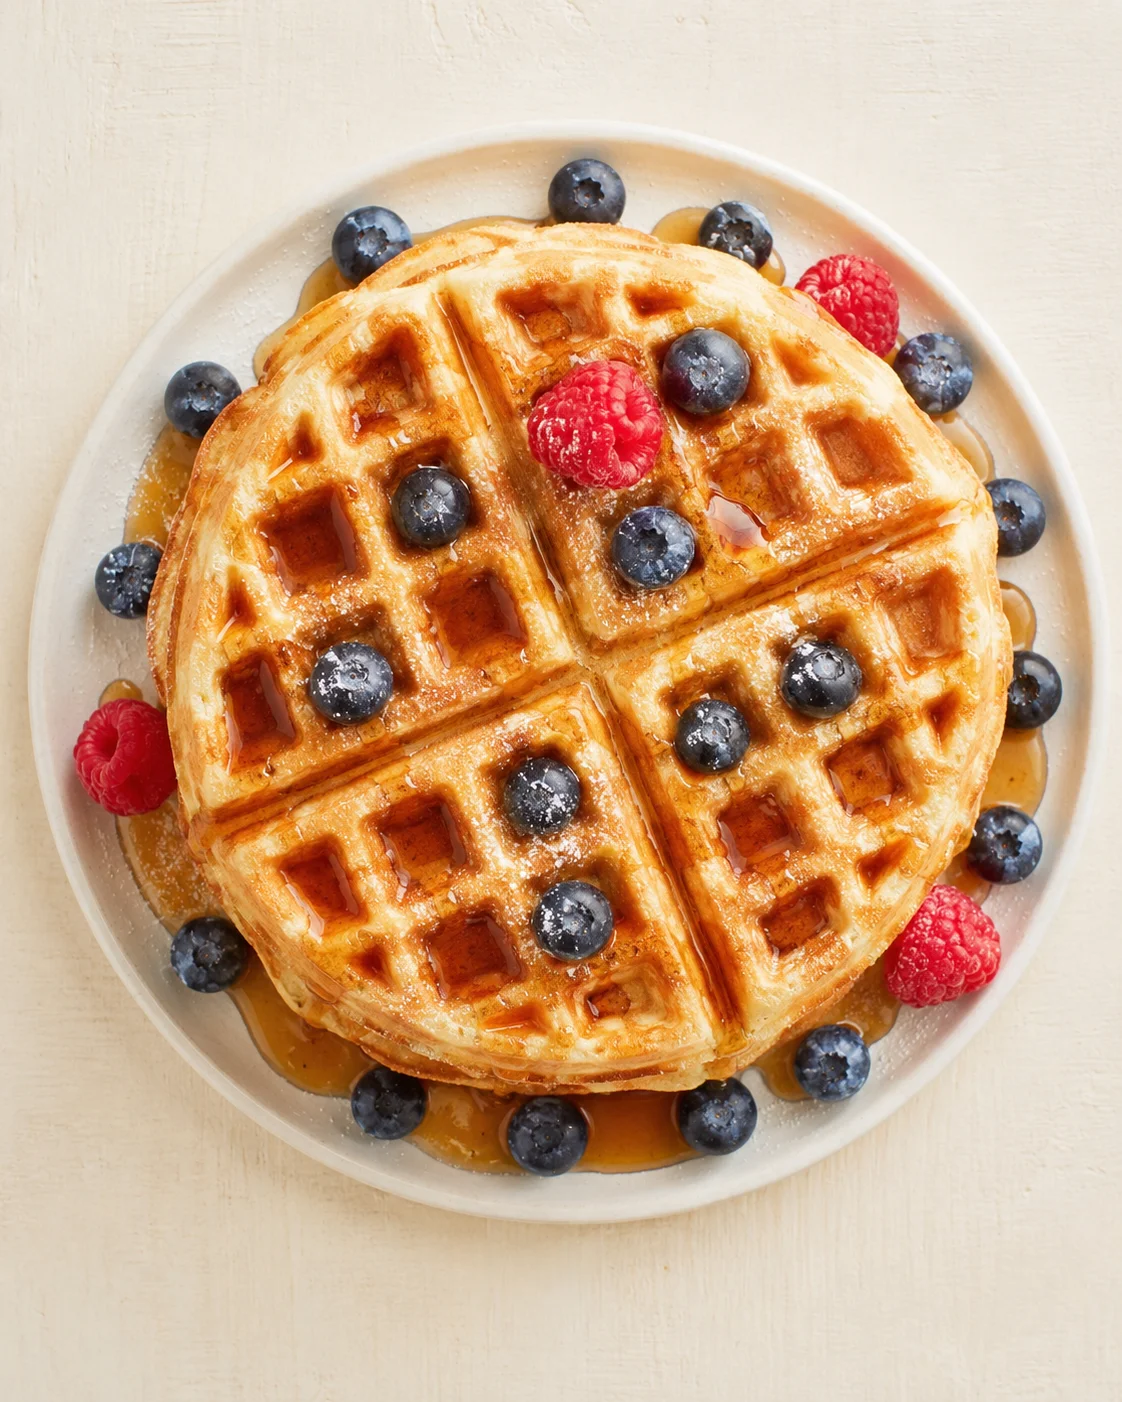
- Ready for Any Topping: Whether you’re all about classic maple syrup and fresh fruit or want to go wild with chocolate sauce and whipped cream, buttermilk waffles handle every topping like a champ and still shine—try a spoonful of quick rhubarb applesauce for a tangy twist.
- Perfect for Freezing: Make a double batch and stash the extras in the freezer. A quick toast or oven warm-up brings your buttermilk waffles back to crispy life after busy mornings or busy weeks.
Ingredients and Why They Matter
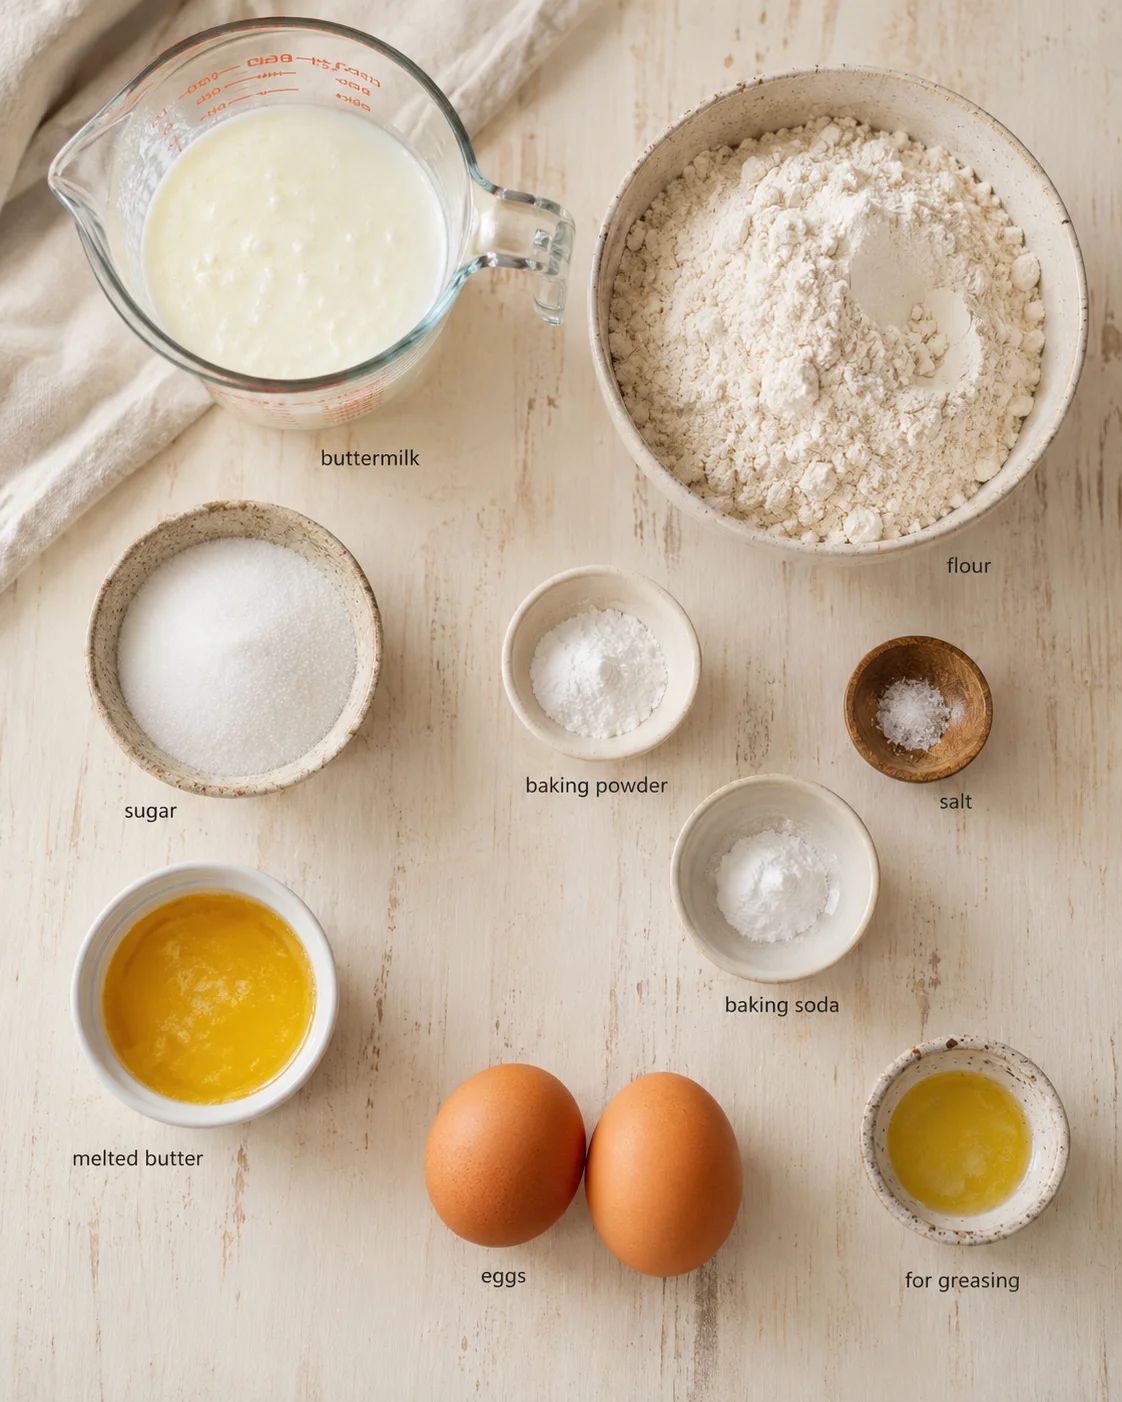
- Buttermilk (or quick substitute: stir 1 tablespoon lemon juice or white vinegar into a measuring cup, fill to 1 cup with milk (dairy or non-dairy) and let sit 5–10 minutes until slightly curdled)
- All-Purpose Flour
- Sugar
- Baking powder
- Baking soda
- Salt
- Melted unsalted butter
- Eggs
- Cooking spray or melted butter (for greasing the waffle iron)
Mixing, Cooking, and Serving
- If you don’t have buttermilk, stir 1 tablespoon lemon juice or white vinegar into a measuring cup and fill to 1 cup with milk; let sit 5–10 minutes until slightly curdled.
- Bring eggs and buttermilk (or the substitute) to room temperature.
- Melt unsalted butter and cool until warm but not hot.
- Whisk together flour, sugar, baking powder, baking soda, and salt in a large bowl.
- In a separate bowl, whisk together the buttermilk, cooled melted butter, and eggs.
- Pour the wet ingredients into the dry and gently fold with a spatula or wooden spoon until no dry flour streaks remain, leaving a few lumps; do not overmix.
- Let the batter rest for 5–10 minutes.
- Preheat the waffle iron according to the manufacturer’s directions and lightly grease with cooking spray or melted butter.
- Do a test waffle to determine the correct batter amount and cook time for your iron.
- Pour or ladle batter to fill about two-thirds of the waffle iron (fold in or sprinkle any mix-ins gently after ladling).
-
Close the iron and cook until waffles are golden and the steam slows (about 3–5 minutes); avoid opening early.
- Use a fork or tongs to lift waffles out and transfer to a wire rack; keep cooked waffles warm in a 200°F/93°C oven on a wire rack while finishing the batch.
Pro Tips for Better Waffles
Here are some easy tweaks to help you get those light, crispy buttermilk waffles every time—and they work for pancakes, too; try our Greek Yogurt Pancakes for a similar tender-crumb batter.
- Let eggs and buttermilk warm up to room temp. This makes your batter blend better and give smoother results.
- Never overmix! Fold dry and wet ingredients gently until just combined. Those few lumps? They’re your fluffy friends.
- Rest your batter for a little while. That 5–10 minute break is key to tender waffles.
- Always preheat and lightly grease your waffle iron—even nonstick types need it for golden edges and no sticking.
- Hold off on opening the iron until steam slows or the indicator signals. Early peeking can cause your waffle to tear or deflate.
- Do a test waffle to find your iron’s perfect batter amount and cook time—no two irons are the same!
- Mix-ins? Add them carefully! Fold in chocolate chips, nuts, or berries gently or sprinkle them on top after ladling in the batter.
- To keep waffles crisp while you finish cooking, stack them on a wire rack in a warm oven instead of piling them up, which traps moisture and softens them.
- Use fresh baking powder and baking soda for the best rise and fluffy texture—always check your expiration dates.
Flavor Variations and Add-Ins
While these buttermilk waffles are amazing plain, I love to mix things up based on the mood. Here are some fun ideas to personalize your waffles:
- Fresh & Fruity: Top with a mix of fresh berries like blueberries, strawberries, or raspberries. Sliced bananas, a drizzle of homemade strawberry syrup, or a swirl of vanilla maple syrup add a lovely touch too. A dusting of powdered sugar never hurts!
- Decadent Desserts: Chocolate chips in the batter make waffles feel like a treat on their own. Serve warm waffles with whipped cream, hot fudge sauce, and a cherry on top, or a scoop of vanilla ice cream for something extra special.
- Savory Brunch: Try pairing your buttermilk waffles with crispy fried chicken and drizzle on some hot honey—sweet meets savory in the best way.
- Warm Spices: Add a pinch of cinnamon, nutmeg, or even pumpkin pie spice to the dry mix for cozy fall vibes all year round.
- Nutty Crunch: Fold in chopped pecans or walnuts for texture and a lovely nutty flavor. For a heartier, subtly nutty base, you can also swap in some whole wheat flour (see these whole wheat pancakes for ratios and tips).
- Freeze & Enjoy Later: Make a big batch, cool completely, then separate waffles with parchment paper and freeze in an airtight container. Ready for a quick toast on busy mornings!
How to Store and Freeze Waffles
How you cool and store buttermilk waffles can make or break their texture later.
- Cool completely on a wire rack before storing—this stops steam from making waffles soggy.
- For short-term storage, stack cooled waffles between sheets of parchment paper in an airtight container or resealable bag in the fridge for up to 3 days.
- For longer storage, freeze waffles in a single layer on a baking sheet until firm, then transfer to a freezer-safe container with parchment between layers. They keep best for 2–3 months this way.
- To reheat from frozen, pop waffles straight into a toaster or toaster oven for a few minutes until they’re warm and crispy. For larger batches, warming in a 300°F (150°C) oven on a baking sheet for 8–12 minutes works great—flip once for even crispness.
- If you’ve stored waffles in the fridge, reheat them in a toaster or oven (300°F/150°C) for 5–8 minutes to keep edges crisp. Skip the microwave to avoid soggy waffles.
- For make-ahead batter, mix it and use after resting 5–10 minutes for the best rise. You can prepare components separately and mix just before cooking, or refrigerate fully mixed batter up to 24 hours. Expect a slight dip in fluffiness, but a small pinch of baking powder before cooking helps boost lift.
Answers to Common Waffle Questions
What makes buttermilk waffles so fluffy?
The magic lies in buttermilk’s acidity—it reacts with baking soda to create tiny bubbles that puff up the batter, giving your waffles a light, fluffy texture. Plus, buttermilk softens the flour’s gluten, making the waffles tender and soft instead of tough.
Can I substitute for buttermilk if I don’t have any?
Absolutely! Just mix 1 tablespoon of lemon juice or white vinegar into a cup of regular milk and let it sit for 5–10 minutes. It won’t be the exact same, but it’s a great backup for when you’re out of buttermilk and still want delicious waffles.
How do I prevent my buttermilk waffles from sticking to the iron?
Even if your waffle iron claims to be non-stick, always preheat it well and give it a light greasing with cooking spray or melted butter before each waffle. Also, resist opening the iron too soon—letting the waffle finish cooking fully helps it release cleanly.
How can I store and reheat leftover buttermilk waffles?
Cool leftover waffles completely, separate them with parchment paper, then store in an airtight container or freezer bag in your fridge for up to three days or freeze them for up to 2–3 months. When you want to enjoy, just toast or warm them in the oven until crispy and heated through.
A comforting recipe for light, fluffy, and crispy buttermilk waffles, using simple pantry ingredients and easy techniques to recreate a family tradition of delicious weekend breakfasts.
- Prep Time: 10 minutes
- Cook Time: 3-5 minutes per waffle
- Total Time: 30 minutes (including resting and cooking)
- Yield: 4-6 waffles depending on waffle iron size 1x
- Category: Breakfast
- Cuisine: American
Ingredients
- 1 cup buttermilk (or substitute: 1 tablespoon lemon juice or white vinegar + milk to 1 cup, let sit 5–10 minutes)
- 1 1/2 cups all-purpose flour
- 2 tablespoons sugar
- 1 teaspoon baking powder
- 1/2 teaspoon baking soda
- 1/4 teaspoon salt
- 4 tablespoons unsalted butter, melted and cooled
- 2 large eggs, brought to room temperature
- Cooking spray or melted butter for greasing the waffle iron
Instructions
- If using the buttermilk substitute, stir 1 tablespoon lemon juice or white vinegar into a measuring cup, fill with milk to 1 cup, and let sit 5–10 minutes until slightly curdled.
- Bring eggs and buttermilk (or substitute) to room temperature.
- Melt unsalted butter and allow to cool until warm but not hot.
- In a large bowl, whisk together flour, sugar, baking powder, baking soda, and salt.
- In a separate bowl, whisk together the buttermilk, cooled melted butter, and eggs.
- Pour the wet ingredients into the dry ingredients and gently fold with a spatula or wooden spoon until no dry flour streaks remain, leaving a few small lumps; do not overmix.
- Let the batter rest for 5–10 minutes.
- Preheat the waffle iron according to the manufacturer’s directions and lightly grease with cooking spray or melted butter.
- Perform a test waffle to determine the correct batter amount and cook time for your waffle iron.
- Pour or ladle batter to fill about two-thirds of the waffle iron; gently fold in mix-ins if using or sprinkle on top.
- Close the iron and cook until waffles are golden and steam slows, about 3–5 minutes; avoid opening early to prevent tearing or deflating.
- Use a fork or tongs to lift waffles out and transfer to a wire rack; keep cooked waffles warm in a 200°F (93°C) oven on a wire rack while finishing the batch.
Notes
Allow eggs and buttermilk to reach room temperature for smoother batter blending and better texture., Do not overmix batter; lumps help keep waffles fluffy., Resting batter for 5–10 minutes improves tenderness., Grease and preheat waffle iron to prevent sticking and encourage golden edges., Wait until steam slows to open waffle iron, avoiding waffle tearing or deflation., Add mix-ins like chocolate chips, nuts, or berries carefully to avoid batter deflation., Use fresh baking powder and baking soda for best rise and texture., Cool waffles completely on a wire rack before storing to prevent sogginess., Store waffles in the fridge for up to 3 days between parchment sheets in an airtight container., Freeze waffles in a single layer until firm, then layer with parchment in freezer-safe containers for 2–3 months storage., Reheat frozen waffles in a toaster or in a 300°F (150°C) oven for 8–12 minutes, flipping once for even crispness., Avoid microwave reheating to prevent soggy waffles., Make-ahead batter can be refrigerated up to 24 hours; add a pinch of baking powder before cooking to boost fluffiness if storage time is extended.
Nutrition
- Serving Size: 1 waffle
- Calories: Approximately 220 calories per waffle (without toppings)
- Fat: 11 g per serving
- Carbohydrates: 25 g per serving
- Protein: 6 g per serving
More in Recipes


Carrot and Lentil Soup

Spiced Carrot and Apple Soup