Easy Peach Cobbler with Canned Peaches (Delicious & Quick)

There’s nothing quite like a warm, gooey peach cobbler bubbling with sweet flavor to bring comfort to any table. What’s even better? You don’t have to worry about fresh fruit when you have this canned peach cobbler recipe in your back pocket.
If you’re pressed for time or just want an easy dessert that packs a flavor punch without the fuss, this simple peach cobbler with canned peaches is a total winner.
This dessert fills your kitchen with those cozy aromas and is sure to please everyone, even the little ones who can be picky about fruit.
In this post, I’ll share a straightforward recipe, handy tips for working with canned peaches, and fun ways to mix things up so it never gets boring.
Let’s get cooking!
This Easy Peach Cobbler with Canned Peaches comes straight from Southern comfort food traditions but calls for just easy-to-find pantry ingredients. It features a golden, buttery crust layered with tender, juicy peaches—and the best part? You can have it ready in under an hour, no peeling or slicing required.
Using canned peaches streamlines the process and still delivers that homemade feel that everyone loves.
This canned peach cobbler recipe is as simple as it gets—no fancy steps, just warm, buttery comfort with plenty of juicy peaches tucked inside. You don’t have to fuss over fresh fruit either, thanks to the trusty can of sliced peaches and a handful of pantry basics.
In just under an hour, you’ll pull a golden, tender cobbler out of the oven that easily serves 8 hungry mouths. It’s a breeze for weeknight dinners, potlucks, or anytime you want a sweet, nostalgic treat.
Here’s what you’ll find below:
- A clear, step-by-step recipe and full ingredient list.
- Pro tips on picking and handling canned peaches so your filling is perfectly balanced—not too watery, not too thick.
- Simple flavor swaps and add-ins to suit your taste or dietary needs.
- Smart storage and make-ahead advice so you can enjoy leftovers without any hassle.
- Answers to common questions to make your baking even smoother.
Stick with me through these easy steps, and you’ll surprise yourself with how effortless and tasty this canned peach cobbler recipe is!
Why Canned Peaches Shine
Canned peaches are a superstar shortcut in this recipe. They keep things convenient without skimping on flavor or texture. Here’s why I love using them:
- They’re available all year long: No waiting for peach season or hunting for fresh ones. If you do have ripe fruit on hand, try our gluten-free peach cobbler with fresh peaches.
- They save a ton of prep time: No peeling, slicing, or pitting necessary.
- They’re budget-friendly: Cans tend to cost less than fresh or frozen, which is great when you’re feeding a crowd.
- They pack a sweet, juicy punch: Whether canned in syrup or juice, they bring great moisture and flavor to your cobbler.
Having these pantry staples handy means you can whip up a comforting peach cobbler anytime the craving hits, without the extra work.
Pantry Ingredients You’ll Need
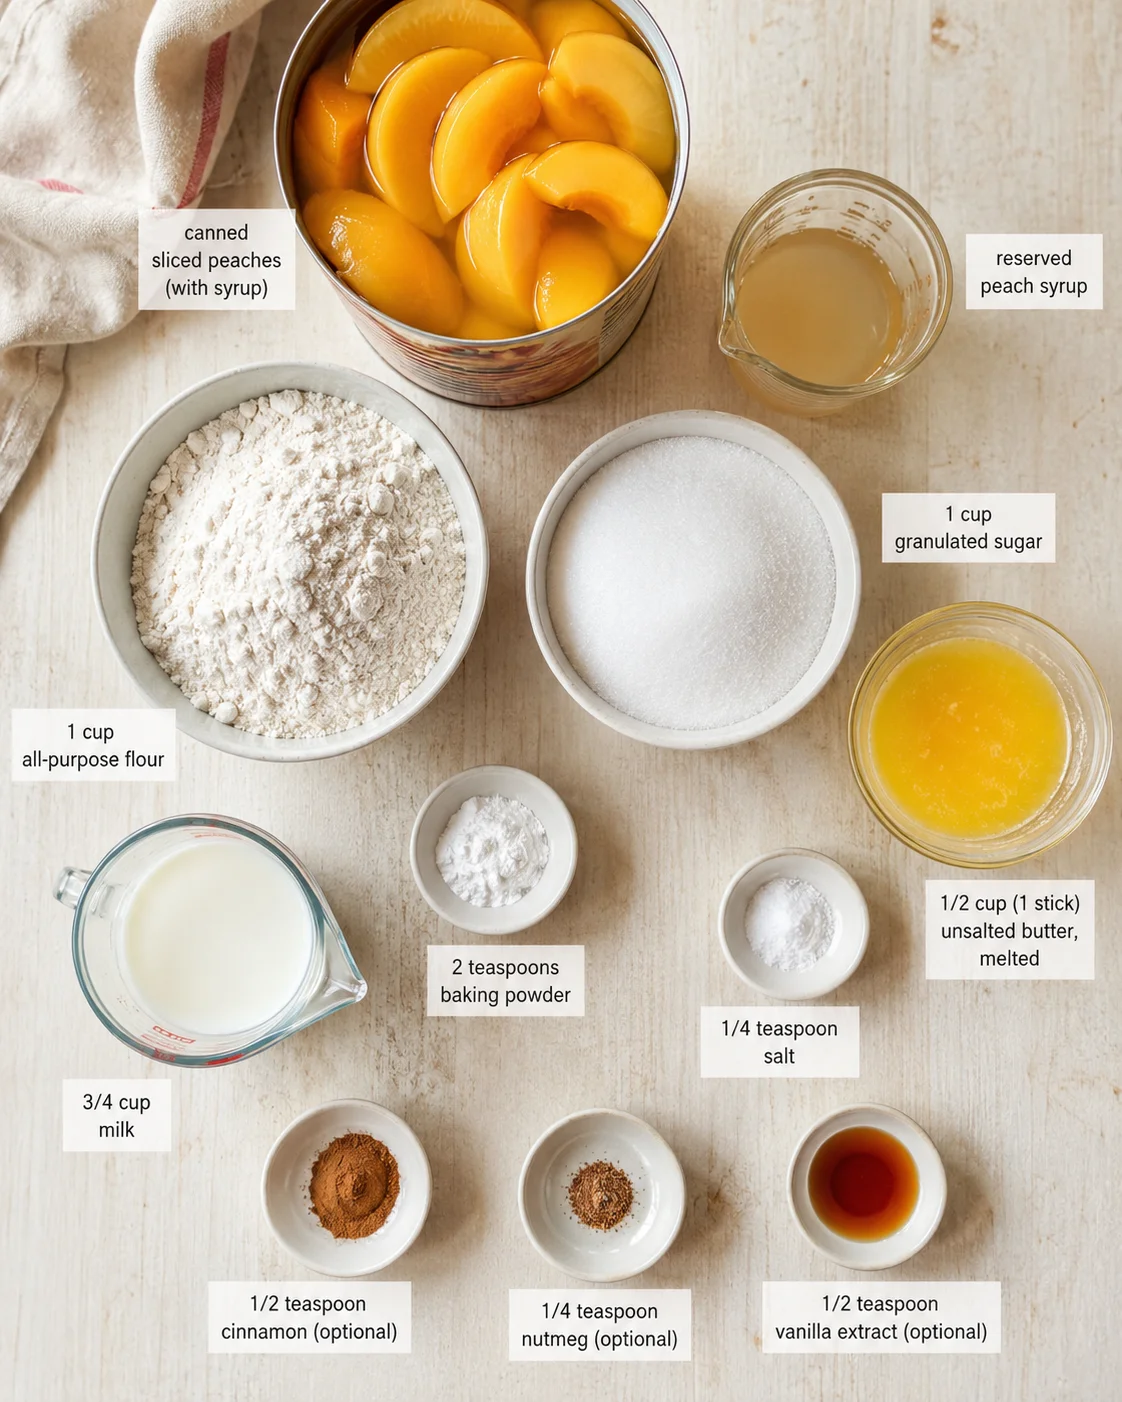
- 1 large can (29 oz) sliced peaches with about half the syrup reserved
- 1 cup all-purpose flour
- 1 cup granulated sugar
- 2 teaspoons baking powder
- ¼ teaspoon salt
- ½ cup 1 stick unsalted butter melted
- ¾ cup milk
- ½ teaspoon cinnamon optional
- ¼ teaspoon nutmeg optional
- ½ teaspoon vanilla extract optional
Assembly and Baking Steps
- Preheat the oven to 350°F (175°C).
- Place 1/2 cup (1 stick) unsalted butter in a 9×13-inch baking dish and put the dish in the oven until the butter melts; remove the dish.
- Drain the canned peaches, reserving about 1/4 to 1/2 cup of the syrup or juice.
- Whisk together 1 cup all-purpose flour, 1 cup granulated sugar, 2 teaspoons baking powder, and 1/4 teaspoon salt.
- Stir in 3/4 cup milk and 1/2 teaspoon vanilla extract (if using) until just combined.
- Pour the batter gently over the melted butter in the baking dish without stirring.
- Spoon the drained peaches evenly over the batter and drizzle the reserved syrup or juice over the top without stirring.
- Sprinkle 1/2 teaspoon cinnamon and 1/4 teaspoon nutmeg over the peaches, if desired.
-
Bake at 350°F (175°C) for 40 to 45 minutes, until the top is golden and a toothpick inserted into the crust comes out clean.
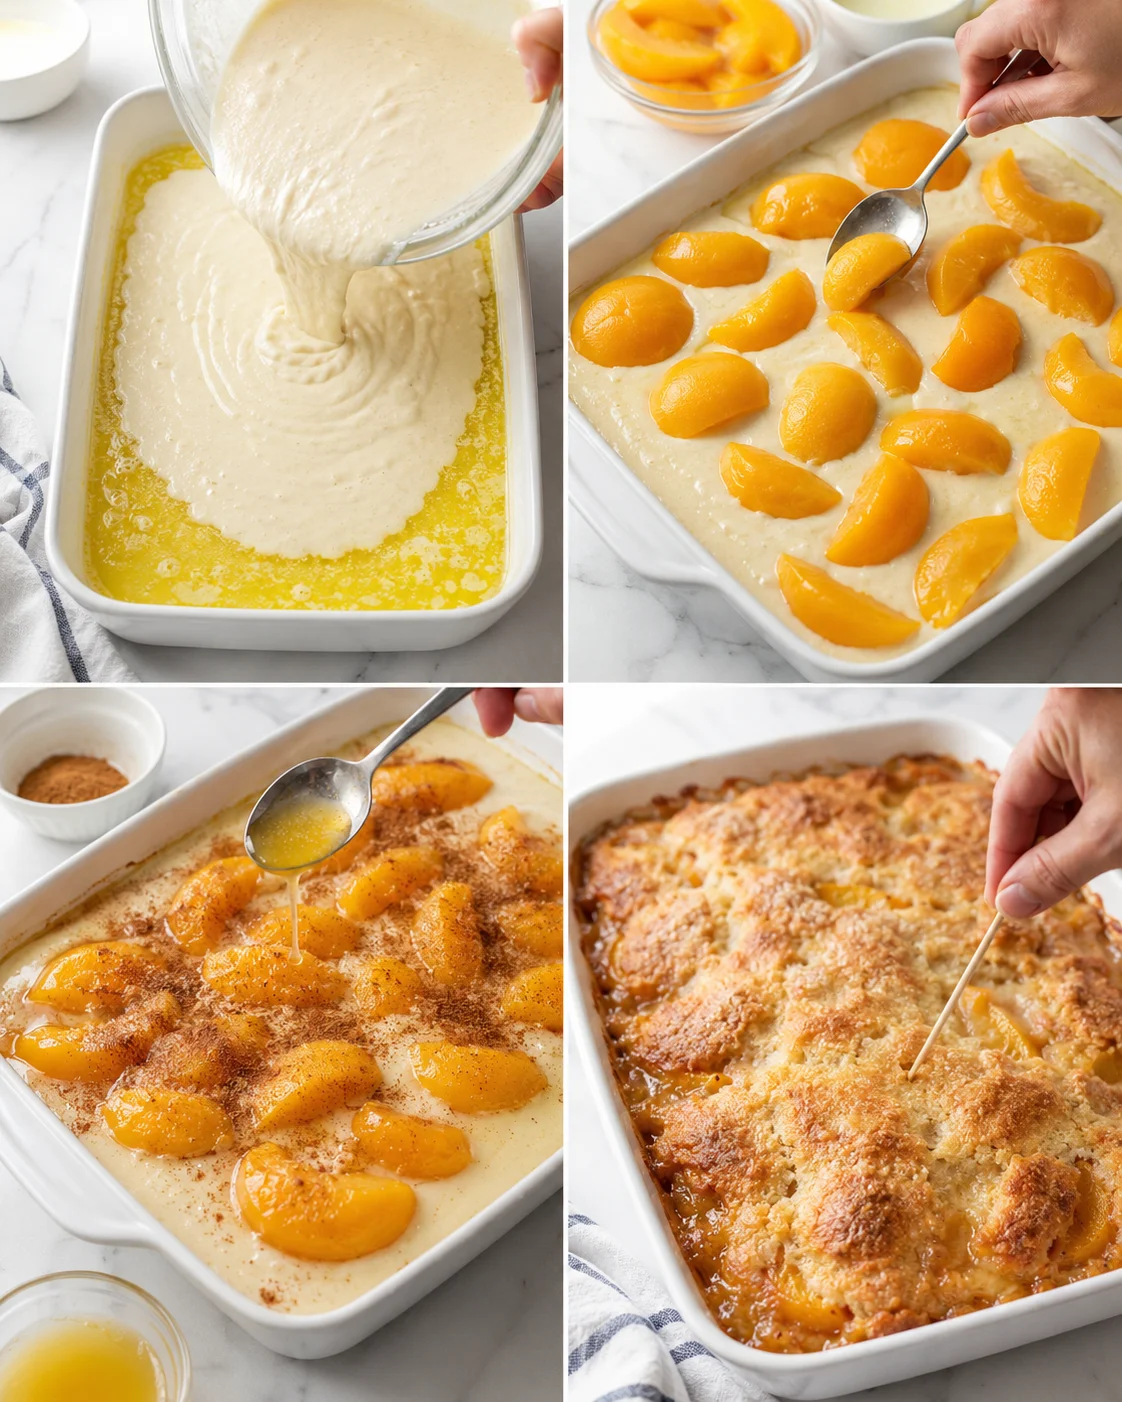
- Let the cobbler cool for about 10 minutes before slicing and serving.
Tips for Choosing and Using Peaches
Picking the right canned peaches and handling them properly plays a big role in the success of your cobbler. Here’s what I’ve learned:
- Heavy syrup peaches: Give you a sweet, rich filling. Pick these if you want a dessert that leans sweet and luscious.
- Light syrup or juice-packed peaches: Offer a lighter, more natural sweetness. Perfect if you want to keep sugar lower or a fresher fruit taste. They’re also great in high-protein Peach Pie Cottage Cheese Bowls if you have extras to use up.
- To drain or not to drain: Use about half of the syrup or juice for moisture and flavor, but don’t add it all or your cobbler will be soggy instead of tender.
- Brands to trust: Del Monte, Libby’s, and many store brands make consistently good canned peaches for baking.
If your peaches are packed in juice, you might want to add a little extra sugar or spices like cinnamon to boost flavor, because juice is less sweet than syrup.
- Keep the layers separate: The magic is in letting the batter rise around the peaches, so don’t stir once you add the fruit.
- Try self-rising flour if you want a fluffier crust without adding baking powder separately.
- Boost flavor: Lemon zest or almond extract add bright, tasty notes if you want to jazz it up.
- Let it rest: Allow a little cooling time for the cobbler to set so you get neat, perfect servings.
Flavor Twists and Add-Ins
There’s lots of ways to make this canned peach cobbler recipe uniquely yours! Here are some of my favorite twists:
- Add fresh or frozen berries: Blueberries, raspberries, or blackberries pair beautifully with peaches for extra color and tang—if you love a sweet-tart contrast, a little rhubarb works too (see this easy rhubarb dump cake for how it bakes up).
- Brown sugar topping: Sprinkle some brown sugar on top before baking for a caramelized, crunchy crust.
- Spiced up: Toss in more cinnamon or add a pinch of ground ginger for a cozy, fall-inspired vibe.
- Serve it with: A scoop of vanilla ice cream, a dollop of whipped cream, or some tangy Greek yogurt for a delightful balance. For a fun brunch twist, spoon warm cobbler over crispy cornbread waffles.
- Gluten-free option: Swap the flour for a 1-to-1 gluten-free blend without any hassle.
- Vegan swap: Use plant-based butter and your favorite non-dairy milk like almond or oat milk to keep it dairy-free.
Storing, Freezing, and Reheating
This canned peach cobbler recipe keeps well, making it great for leftovers or prepping ahead:
- Refrigerate extras: Cover and store in the fridge for up to 5 days. It’s just as tasty the next day!
- Reheat in the oven: Warm at 300°F for about 10 minutes to refresh the crisp crust.
- Microwave: Quick and easy—heat your individual portion for 30 to 45 seconds.
- Freeze it: Wrap tightly and freeze for up to 2 months. Thaw in the fridge overnight and reheat before serving.

Common Questions Answered
Can I use peaches packed in juice instead of syrup?
Definitely! Using peaches in juice will give you a lighter, less sweet cobbler. I recommend adding a little extra sugar or warm spices to keep the flavor balanced.
Can I make this recipe ahead of time?
Yes! You can even bake it a day early. Just cover it well and chill in the fridge, then reheat before enjoying—it’s fantastic spooned over buttermilk waffles for breakfast.
Should I drain the canned peaches before using them?
Yes, but only partially. Drain most of the syrup or juice, reserving about a quarter to a half cup to pour over the batter for moisture and extra flavor.
Can I freeze peach cobbler?
You sure can. Wrap it tightly with plastic wrap and foil, freeze for up to 2 months, thaw in the fridge overnight, and then warm it up before serving.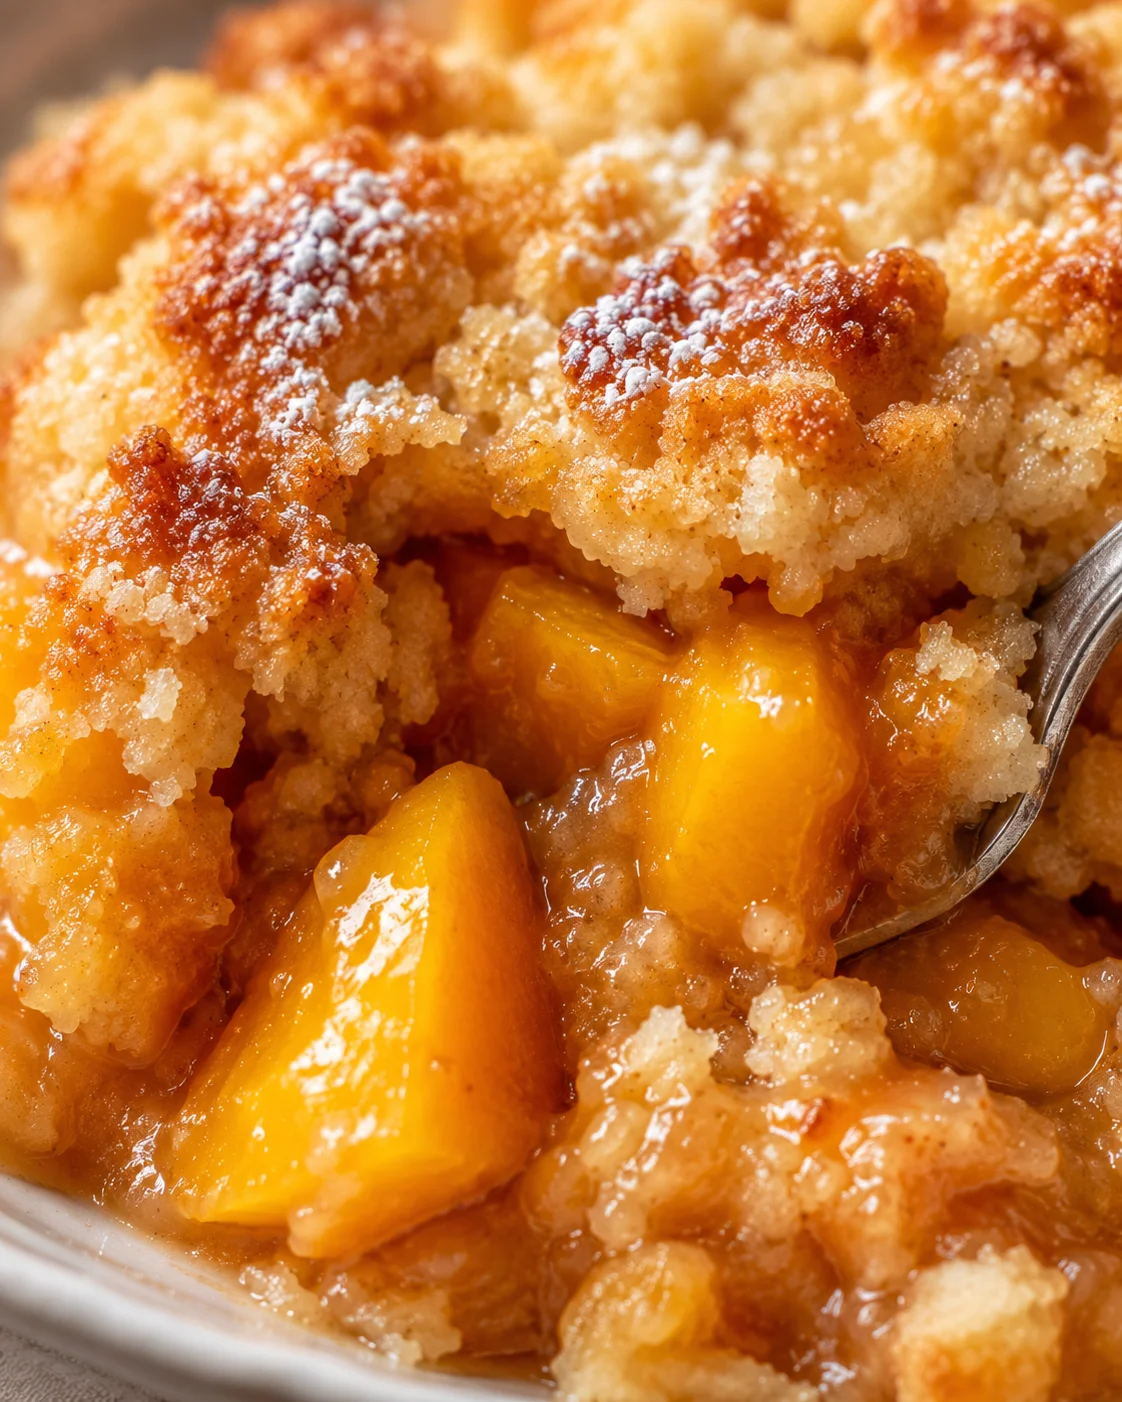
A warm, comforting peach cobbler made with canned sliced peaches and a golden, buttery crust. Ready in under an hour with pantry staples and no fresh fruit prep required.
- Prep Time: 10 minutes
- Cook Time: 40 minutes
- Total Time: 50 minutes
- Yield: 8 servings 1x
- Category: Dessert
- Cuisine: American, Southern
Ingredients
- 1 large can (29 oz) sliced peaches with about half the syrup reserved
- 1 cup all-purpose flour
- 1 cup granulated sugar
- 2 teaspoons baking powder
- 1/4 teaspoon salt
- 1/2 cup (1 stick) unsalted butter, melted
- 3/4 cup milk
- 1/2 teaspoon cinnamon (optional)
- 1/4 teaspoon nutmeg (optional)
- 1/2 teaspoon vanilla extract (optional)
Instructions
- Preheat the oven to 350°F (175°C).
- Place 1/2 cup (1 stick) unsalted butter in a 9×13-inch baking dish and put it in the oven until melted; remove the dish.
- Drain the canned peaches, reserving about 1/4 to 1/2 cup of the syrup or juice.
- Whisk together flour, sugar, baking powder, and salt in a mixing bowl.
- Stir in milk and vanilla extract (if using) until just combined—do not overmix.
- Pour the batter gently over the melted butter in the baking dish without stirring.
- Spoon the drained peaches evenly over the batter and drizzle reserved syrup or juice on top without stirring.
- Sprinkle cinnamon and nutmeg on top if desired.
- Bake for 40 to 45 minutes until the top is golden brown and a toothpick inserted in the crust comes out clean.
- Let cool for about 10 minutes before slicing and serving.
Notes
Use heavy syrup peaches for a sweeter, richer filling and light syrup or juice-packed peaches for a lighter sweetness., Adjust sugar or add spices if using juice-packed peaches., Keep the batter and peaches layered without stirring to allow the batter to rise around the peaches., Try self-rising flour to skip baking powder., Add flavor twists such as fresh or frozen berries, brown sugar topping, extra spices, lemon zest, or almond extract., For gluten-free, substitute 1-to-1 gluten-free flour blend., For vegan option, use plant-based butter and non-dairy milk like almond or oat milk., Store leftovers covered in the fridge for up to 5 days; reheat in oven at 300°F for 10 minutes or microwave for 30-45 seconds., Freeze wrapped tightly for up to 2 months; thaw in fridge overnight before reheating.
Nutrition
- Serving Size: 1 slice
- Calories: 300 kcal per serving
- Fat: 9 g per serving
- Carbohydrates: 48 g per serving
- Protein: 3 g per serving